When you create a common use library, which consists of many sub modules (artifacts), you probably would like to generate a Maven BOM (Bill of Material) file, so that you can avoid version declaration duplication.
Doing it in Maven is quite straightforward, but in Gradle (as of today) it is not well documented and many Gradle based complex projects lack BOM file.
Fortunately Spring IO Dependency Management plugin helps us with doing that.
Let’s start with a simple Gradle based project with two submodules (client and server):

First you need to apply maven-publish and io.spring.dependency-management plugins. The first one will be responsible for BOM generation and the latter one will add a dependencyManagement DSL to define versions of your modules.
1
2
3
4
|
    plugins {
        id 'maven-publish'
        id 'io.spring.dependency-management' version '1.0.5.RELEASE'
    }
|
To simplify project configuration, all projects have following configuration:
 1
 2
 3
 4
 5
 6
 7
 8
 9
10
11
12
|
    allprojects {
        repositories {
            mavenCentral()
        }
        apply plugin: 'java'
        group 'pl.greenpath'
        version '1.0-SNAPSHOT'
        sourceCompatibility = 1.8
        dependencies {
            testCompile group: 'junit', name: 'junit', version: '4.12'
        }
    }
|
Then you need to declare versions of modules in dependencyMangement section. We will add all gradle modules (subprojects) so that we are not forced to manually add each new module.
1
2
3
4
5
6
7
|
    dependencyManagement {
        dependencies {
            rootProject.subprojects.each {
                dependency(group: it.group, name: it.name, version: it.version)
            }
        }
    }
|
Then, all we need to do is to declare maven BOM generation using maven-publish plugin’s DSL. We need to define mavenBom empty publication (without additional artifacts defined).
1
2
3
4
5
6
|
    publishing {
        publications {
            mavenBom(MavenPublication) {
            }
        }
    }
|
Now, everything is done and we can test it:
1
|
./gradlew publishToMavenLocal
|
In effect we have following BOM artifact generated:
 1
 2
 3
 4
 5
 6
 7
 8
 9
10
11
12
13
14
15
16
17
18
19
20
21
22
|
    <?xml version="1.0" encoding="UTF-8"?>
    <project xmlns="http://maven.apache.org/POM/4.0.0" xsi:schemaLocation="http://maven.apache.org/POM/4.0.0 http://maven.apache.org/xsd/maven-4.0.0.xsd" xmlns:xsi="http://www.w3.org/2001/XMLSchema-instance">
      <modelVersion>4.0.0</modelVersion>
      <groupId>pl.greenpath</groupId>
      <artifactId>bom-demo</artifactId>
      <version>1.0-SNAPSHOT</version>
      <packaging>pom</packaging>
      <dependencyManagement>
        <dependencies>
          <dependency>
            <groupId>pl.greenpath</groupId>
            <artifactId>server</artifactId>
            <version>1.0-SNAPSHOT</version>
          </dependency>
          <dependency>
            <groupId>pl.greenpath</groupId>
            <artifactId>client</artifactId>
            <version>1.0-SNAPSHOT</version>
          </dependency>
        </dependencies>
      </dependencyManagement>
    </project>
|
I hope this going to help you create useful BOM files. Having BOM’s it is easier to keep track of project’s dependencies and to enforce consistent versioning across applications you create.
Recently Kernel 4.17 has been released. It has a major power consumption improvement so I decided to check it out now, before it is officially supported in Ubuntu 18.04.
There is a nice tool to do the upgrade on Ubuntu, it is called ukuu.
To install it just type:
1
2
|
$ sudo add-apt-repository ppa:teejee2008/ppa
$ sudo apt install ukuu
|
Then you are ready to go.
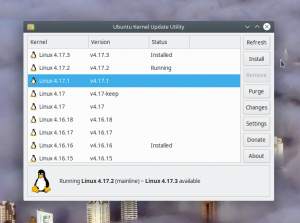
Ukuu has a nice graphical interface

All you need to do is choose the right version (4.17.2 in my case) and install it.
After reboot you should see the new kernel.
You can check it by typing
1
2
|
$ uname -r
4.17.2-041702-generic
|
The kernel seems to be very stable. I didn’t see any problems since the upgrade.
Have fun!
Sometimes, when creating web application, we want to enable user to upload files to a server.
The uploaded file can be an image, document or any other regular file.
Developing our application using Spring should be relatively simple, so we need simple method for uploading files using this beautiful framework :-).
In our example I’ll use a Company entity, which among the others will contain an Image object with Data of the image and its name.
My Company entity looks like this:
 1
 2
 3
 4
 5
 6
 7
 8
 9
10
11
12
13
14
15
16
17
18
|
@Entity
@Table
public class Company {

	@Id
	@GeneratedValue(strategy = GenerationType.AUTO)
	private Long id;

	@ManyToOne(cascade = CascadeType.ALL)
	private Address address;

	@NotEmpty
	private String name;

	@OneToOne(cascade = CascadeType.ALL)
	private Image image;
    ... accessors ommitted
}
|
As you can see I need company Address, Name and Image.
In this example image is identified by name and data (content of image file), but you can do whatever you want with uploaded data, during conversion process.
On Spring Framework’s documentation sites we can see a usage of custom editor support to convert file uploaded using HTML form into regular Java object.
I went in a different way and used ConversionService to easily convert file from HTTP POST request, which is more comfortable for me.
If you want to use ConversionService you’ll need to create a converter, which implements org.springframework.core.convert.converter.Converter interface.
Let’s create converter then:
 1
 2
 3
 4
 5
 6
 7
 8
 9
10
11
12
13
|
...
import org.springframework.core.convert.converter.Converter;
import org.springframework.web.multipart.MultipartFile;
...
public class MultipartFileToImageConverter implements Converter<MultipartFile, Image> {
	@Override
	public Image convert(final MultipartFile source) {
		final Image image = new Image();
                image.setData(source.getBytes());
		image.setName(source.getOriginalFilename());
		return image;
	}
}
|
We need to register our converter in conversion service, so in application context we add:
1
2
3
4
5
6
7
|
<bean id="conversionService" class="org.springframework.format.support.FormattingConversionServiceFactoryBean">
	<property name="converters">
		<set>
			<bean class="pl.greenpath.converter.MultipartFileToImageConverter">
		</set>
	</property>
</bean>
|
I use annotation-based configuration of controllers, so configuration of controller is pretty straightforward:
 1
 2
 3
 4
 5
 6
 7
 8
 9
10
11
12
13
14
|
    @Autowired
    CompanyService companyService;

    ...

	@RequestMapping(value = "", method = RequestMethod.POST)
	public String doEdit(@Valid final Company company, final Errors errors) {
		if (errors.hasErrors()) {
			return "admin/companies/edit";
		} else {
			companyService.save(company);
			return "redirect:/admin/companies/" + company.getId();
		}
	}
|
Going this way we have company object with filled data from HTML form.
To obtain image data we just need to invoke e.g. company.getImage().getName();
The main advantage of this solution is its simplicity. You don’t need to create configuration of editors in your controller. All you need is to create a converter and register it in ConversionService. Spring will do all other stuff for you.
I hope it will help simplifying your web app :-).

